Hot Water Heater Leak: 3 Urgent Steps
Understanding the Urgency of a Hot Water Heater Leak
Ahot water heater leakdemands immediate attention to prevent costly water damage, safety hazards, and wasted resources. Whether you’ve found a small puddle or a steady stream of water, quick action can mean the difference between a simple repair and thousands of dollars in home damage.
Immediate Steps to Take:
- Turn off the power(flip the circuit breaker) or gas supply (turn the gas valve to “off”)
- Shut off the water supplyby turning the cold water inlet valve clockwise
- Contain the leakwith towels, buckets, or a shop vac
- Call a professional plumberif you’re unsure about the source or severity
According to the EPA, the average household leaks nearly 10,000 gallons of water per year. Even a single drip from your water heater can waste 1,660 gallons annually and add to your water bill. When you factor in potential damage to floors, walls, and possessions, a small leak can quickly become a major headache.
This guide covers everything from emergency shutoff and leak identification to repair vs. replacement decisions and documenting losses for insurance claims.
Water heaters typically last 8-12 years; as they age, leaks become more common. You’ll learn which leaks are DIY-friendly (like a loose connection) and which require a professional (like a corroded tank).

First Things First: Immediate Steps for a Leaking Water Heater
Finding ahot water heater leakcan certainly cause a moment of panic, but staying calm and acting swiftly is key. Our top priority is always safety and preventing further damage to your home in Florida. Before we even think about diagnosing the leak, we need to ensure the situation is under control.

The immediate steps involve shutting off the power or gas supply to the unit and turning off the water supply. This helps to contain the leak and eliminate potential electrical hazards or gas risks. Water and electricity are a dangerous combination, and gas leaks can be even more perilous.
Shutting Off the Power or Gas
Your water heater is either electric or gas-powered, and the shutoff procedure will vary accordingly.
If you have anelectric water heater, head straight to your home’s main electrical panel, typically located in your garage, utility closet, or basement. Locate the circuit breaker labeled for your water heater and flip it to the “off” position. This will immediately cut power to the unit, stopping the heating elements from operating.
For agas water heater, you’ll need to locate the gas shutoff valve, which is usually a small handle or knob on the gas supply line leading to the water heater. Turn this valve to the “off” position. If your gas water heater has a pilot light, this action will also extinguish it. If you’re unsure or uncomfortable with this step, or if you smell gas, evacuate your home immediately and contact your gas company. Safety is paramount.
Turning Off the Water Supply
Once the power or gas is off, the next critical step is to stop the flow of water into the unit. Look for the cold water inlet valve, typically located at the top of your water heater on the pipe that brings cold water into the tank. This valve usually has a handle that you can turn clockwise until it’s completely closed. This will prevent more water from entering the tank and potentially exacerbating thehot water heater leak.
If you can’t locate this specific valve, or if it’s not working, you may need to turn off the main water supply to your entire home. The main shutoff valve is often found near your water meter, in your basement, or where the main water line enters your house. Turning this off will stop all water flow, giving you time to assess the situation without more water pouring out.
After these steps, you can begin containing the existing water with towels, buckets, or a shop vac. While these immediate actions won’t fix the leak, they will minimize damage and create a safer environment for the next steps.
What Causes a Hot Water Heater Leak?
Understanding the root cause of ahot water heater leakis crucial for determining whether it’s a minor repair or a sign of a larger problem. Leaks don’t just happen randomly; they’re often a symptom of component failure, age-related wear and tear, or external factors putting stress on the system.

Identifying the Leak’s Location
The location of the leak can tell us a lot about its origin:
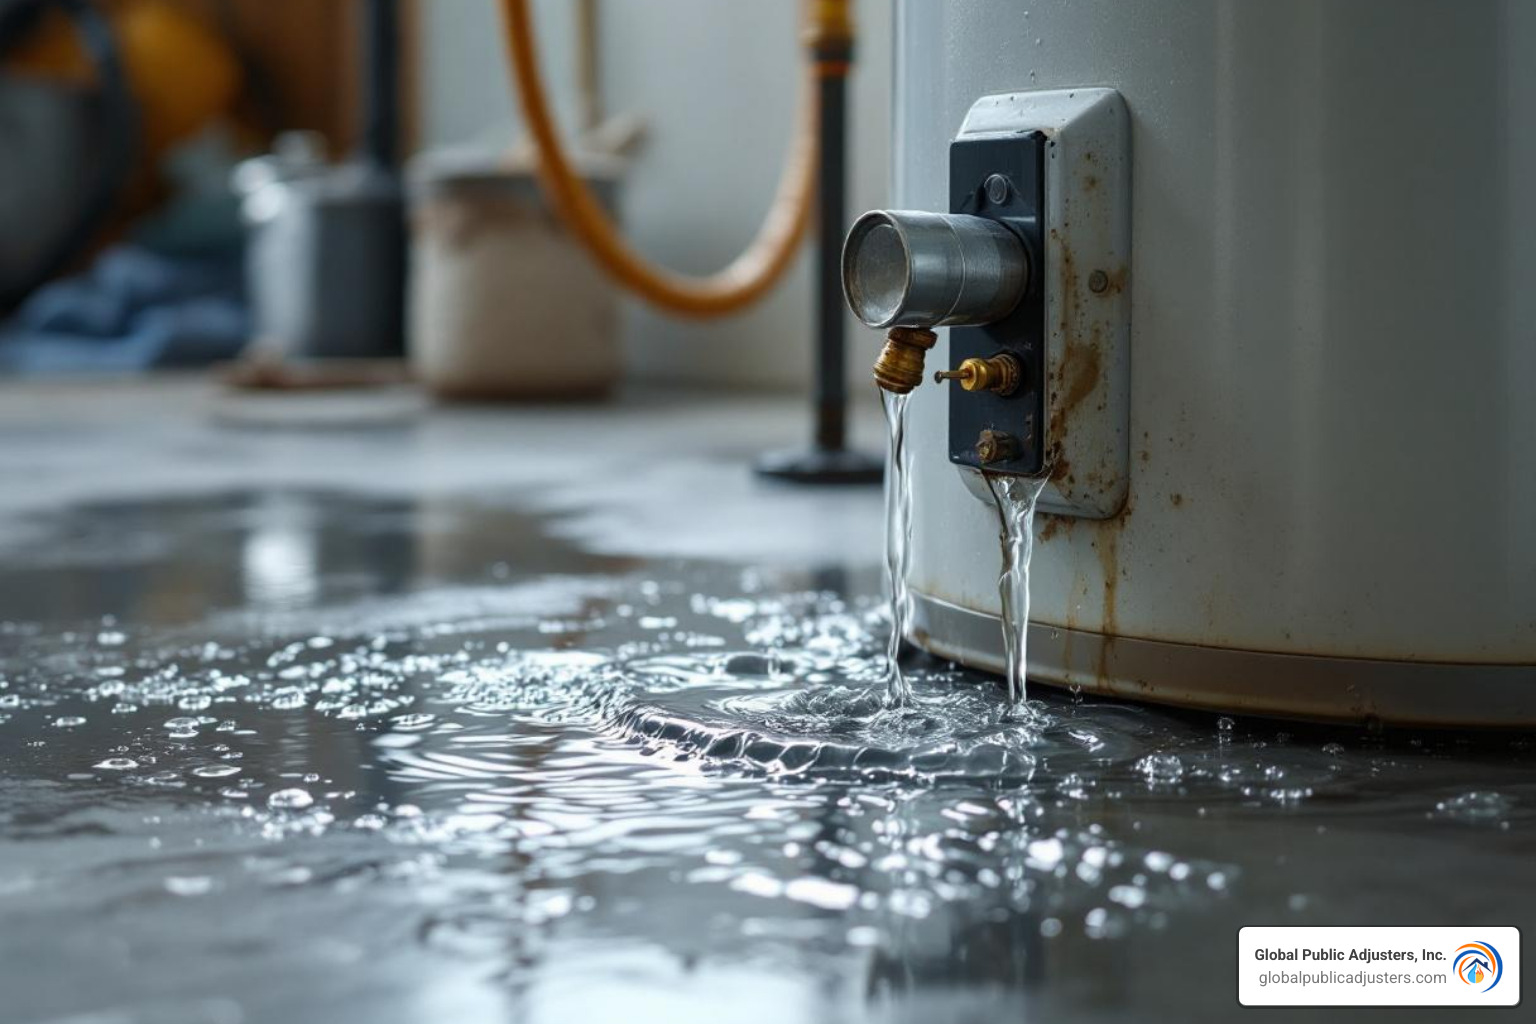
- Leaks from the top:If you see water dripping from the very top of your water heater, the issue is often with the cold water inlet or hot water outlet connections. These pipes can have loose fittings that need tightening. Over time, these connections can corrode or seals can wear out, leading to drips. Sometimes, the leak might also originate from the pressure relief valve, which is usually located on the top or side.
- Leaks from the side:A leak from the side of your water heater is a strong indicator that the Temperature and Pressure (T&P) relief valve is malfunctioning. This crucial safety device is designed to open and release water if the pressure or temperature inside the tank becomes too high, preventing potential explosions. If it’s constantly dripping or spraying, it could be faulty, or it might be doing its job because of excessive pressure or temperature within the tank.
- Leaks from the bottom:This is often the most concerning type of leak. While it could be a simple fix like a loose or corroded drain valve located at the very bottom of the tank, a leak from the bottom can also signal internal tank corrosion. If the tank itself is compromised, it’s generally not repairable, and replacement is the only solution.
Common Culprits: From Corrosion to High Pressure
Beyond specific locations, several common issues can lead to ahot water heater leak:
- Tank Corrosion:This is arguably the most frequent and serious cause of leaks, especially in older units. Over time, the protective lining inside the steel tank can degrade, exposing the metal to water. This leads to rust and eventually small pinhole leaks or cracks. Sediment buildup at the bottom of the tank, often caused by hard water common in Florida, can accelerate this corrosion by creating hot spots that stress the tank lining. As the components in old water heaters begin to deteriorate, leaks can occur.
- Sediment Buildup:Hard water contains minerals that settle at the bottom of the tank, forming a layer of sediment. This layer can reduce efficiency, cause banging noises, and, critically, lead to overheating of the tank’s bottom, causing cracks and leaks. If your water heater is leaking from the bottom, the problem could be excess sediment collection.
- Dissipated Anode Rod:The anode rod is a “sacrificial” component designed to corrode instead of the tank itself. It’s made of a different metal that attracts corrosive elements in the water. Anode rods usually last 3-5 years, but in areas with hard water, they can deplete faster. If the anode rod is fully consumed, the corrosive elements will start attacking the tank, leading to leaks.
- High Water Pressure:Excessive water pressure can put undue stress on your entire plumbing system, including your water heater. This constant strain can lead to leaks at plumbing connection points, or cause the T&P valve to discharge frequently. Water pressure above 80 psi is considered high and can significantly shorten the life of your water heater.
- Faulty Valves:Beyond the T&P valve, the drain valve at the bottom of the tank can become loose, corroded, or simply fail over time, leading to leaks. Inlet and outlet valves can also develop issues with their seals.
Understanding these causes, especially the interplay between hard water, sediment, and corrosion, is key to both fixing current leaks and preventing future ones. For more information on how different types of water heaters work, you can refer to resources like the U.S. Department of Energy’s guide onStorage Water Heaters.
The Fix: Repairing vs. Replacing Your Water Heater
Once you’ve identified the source of yourhot water heater leak, the next big question is: can we fix it, or is it time for a replacement? This decision often comes down to the nature of the leak, the age of your unit, and, of course, cost-effectiveness.
DIY Fixes for Minor Leaks
For some minor leaks, a do-it-yourself approach might be possible, saving you a service call.
- Tightening Connections:If the leak is coming from the cold water inlet or hot water outlet pipes, check if the fittings are loose. Often, a simple tightening with a pipe wrench can resolve the issue, especially if you have flex pipes. Be careful not to overtighten, as this can strip threads or damage the pipes.
- Replacing a Leaky Drain Valve:If the drain valve at the bottom of the tank is the culprit, and the tank itself is intact, you might be able to replace it. First, ensure the power/gas and water supply are off, and drain the tank completely. Then, use an adjustable wrench to carefully remove the old valve and install a new one, twisting it clockwise until snug.
- Testing and Addressing the T&P Valve:If your T&P valve is leaking, you can first try to test it. Place a bucket under the discharge pipe and gently lift the lever for a few seconds. If it continues to leak after you release the lever, the valve might be faulty and need replacement. Before replacing, ensure your water temperature isn’t set too high (Department of Energy suggests 120°F is sufficient for most homes, rather than the common factory setting of 140°F) and that your home’s water pressure isn’t excessively high (above 80 psi). If water pressure is the issue, you may need a pressure-reducing valve or an expansion tank.
For these DIY tasks, you might need a few basic tools: a pipe wrench, a bucket, and possibly a garden hose for draining the tank.
When to Call a Plumber for Your Hot Water Heater Leak
While some leaks can be tackled by a handy homeowner, many situations warrant the expertise of a professional plumber.
- When the Tank Itself is Leaking:This is the most critical scenario. If the leak is coming directly from the body of the water heater tank, it means the internal lining has corroded and failed. Unfortunately, a leaking tank cannot be repaired; it must be replaced. This is particularly common in older units.
- Age Over 10 Years:Water heaters typically last between 8 and 12 years. If your unit is approaching or has exceeded this lifespan and develops a significant leak, especially from the tank, replacement is almost always the more cost-effective option. Newer models are also significantly more energy-efficient, offering long-term savings on your utility bills.EnergyStar.gov provides excellent guidance on when to replace your water heater.
- Extensive Corrosion:If you see significant rust or corrosion on the exterior of the tank, around connections that are not easily tightened, or if rusty water is coming from your taps, it’s a sign of internal corrosion. A professional can assess the extent of the damage.
- Gas Line Work:If your gas water heater requires work on the gas line, always call a licensed professional. Mishandling gas lines can lead to dangerous leaks and explosions.
- Major Electrical Work:Similarly, for electric water heaters, if the leak is related to electrical components or requires complex wiring, a qualified electrician or plumber with electrical expertise should be called.
- Uncertainty:If you’re unsure about the source of the leak, the severity of the problem, or your ability to safely perform a repair, it’s always best to err on the side of caution and call a professional. They have the tools, experience, and knowledge to diagnose and fix the problem correctly and safely.
The Aftermath: Water Damage and Your Insurance Claim
An unaddressedhot water heater leakcan cause significant damage in your Florida home, with hidden dangers and long-term consequences for your property and health.
Potential Risks of Ignoring a Hot Water Heater Leak
Ignoring a leak can lead to a homeowner’s nightmare:
- Structural Damage:Water can seep into subflooring, drywall, and structural beams, weakening them over time. This can lead to sagging floors, warped walls, and compromised structural integrity, requiring costly repairs.
- Mold Growth:Florida’s warm, humid climate is a prime breeding ground for mold. Water leaks create the perfect moist environment for mold spores to flourish, often within 24-48 hours. Beyond property damage, mold can lead to health issues. We have more information onhow mold can damage your home.
- Mildew and Odors:Similar to mold, mildew can develop in damp areas, creating unpleasant, musty odors that permeate your home.
- Electrical Shorts and Fire Hazards:If water contacts electrical wiring, outlets, or appliances, it can cause shorts, power outages, and potentially lead to fires or electrocution risks.
- Health Hazards:Mold and mildew can trigger allergic reactions and respiratory problems. Stagnant water can also become a breeding ground for bacteria and pests.
Documenting Damage for Your Claim
If yourhot water heater leakhas caused significant damage to your Orlando or Pensacola home, filing an insurance claim is likely your next step. Proper documentation is critical to ensure you receive a fair settlement.
Here’s how to effectively document the damage:
- Take Photos and Videos:Once it’s safe, thoroughly photograph and video all affected areas. Capture wide shots for overall impact and close-ups of specific damage, such as warped flooring, stained walls, and the leaking unit.
- Detailed Notes:Keep a written log of everything. Note when the leak was found, the immediate steps you took, who you contacted (plumbers, contractors), and any conversations with your insurance company.
- Save Receipts:Keep all receipts for emergency repairs (like water extraction), new materials, and professional services. This includes plumber invoices and restoration company bills.
- Inventory Damaged Items:Create a detailed list of all personal belongings that were damaged, including brand, model, approximate age, and estimated replacement cost. Take photos of these items as well.
Insurance companies often look for reasons to minimize payouts. Comprehensive, clear documentation strengthens your claim and helps us, as your public adjusters, advocate effectively on your behalf. For more information on what to look for, check out our guide onsome signs of water damage in your home.
Preventing Future Leaks: Essential Water Heater Maintenance
An ounce of prevention is worth a pound of cure, especially when it comes to avoiding a costlyhot water heater leak. Proactive care can significantly extend the lifespan of your unit and save you from the headache and expense of major water damage. Regular maintenance is not just about preventing leaks; it’s also about ensuring your water heater operates efficiently, saving you money on energy bills in the long run.
The Role of the Anode Rod and T&P Valve
Two components play a critical role in preventing leaks and ensuring the safety of your water heater:
- Sacrificial Anode Rod:As we discussed, the anode rod is designed to corrode so your tank doesn’t. It attracts corrosive elements in the water. Regularly inspecting and replacing the anode rod (typically every 3 to 5 years, or more frequently in areas with hard water like parts of Florida) is one of the most effective ways to prevent internal tank corrosion and subsequent leaks. If this rod is fully consumed, your tank becomes vulnerable.
- Temperature and Pressure (T&P) Valve:This valve is your water heater’s most important safety feature, preventing dangerous pressure buildup that could lead to an explosion. It should be tested annually to ensure it’s functioning correctly. To test, place a bucket under the discharge pipe and gently lift the lever for a few seconds. Water should flow out and then stop when you release the lever. If no water comes out, or if it continues to drip afterward, the valve may need replacement.
Here’s a list of annual maintenance tasks we recommend:
- Test the T&P Valve:As described above, ensure it’s operating correctly.
- Inspect for Leaks:Visually check the tank, pipes, and connections for any signs of dripping, rust, or corrosion.
- Check the Anode Rod:Have a professional inspect and replace it if necessary.
- Drain and Flush the Tank:This is crucial for removing sediment.
- Inspect Heating Elements/Burner:For electric units, check elements; for gas, ensure the burner is clean.
- Check Thermostat Settings:Ensure the temperature is set to a safe and efficient 120°F.
Managing Sediment and Water Pressure
Two other factors greatly influence the longevity and leak-prevention of your water heater:
- Flushing the Tank:This is perhaps the most important maintenance task. Over time, minerals in the water, especially in areas with hard water, settle at the bottom of the tank, forming sediment. This sediment can cause corrosion, reduce heating efficiency, and lead to leaks. We recommend flushing your water heater tank annually. To do this, turn off the power/gas and water supply, connect a garden hose to the drain valve, and open the valve to let the water (and sediment) drain out until it runs clear.
- Checking and Managing Water Pressure:High water pressure (above 80 psi) puts undue strain on your water heater and plumbing system, leading to premature wear and leaks. You can test your home’s water pressure with a pressure gauge attached to an outdoor spigot. If the pressure is consistently high, consider installing a pressure-reducing valve (PRV) on your main water supply line. Additionally, if your home has a PRV or a check valve, installing an expansion tank near your water heater is vital. An expansion tank accommodates the natural expansion of heated water, preventing pressure spikes that can stress your water heater and cause the T&P valve to discharge.
By consistently performing these maintenance steps, you can significantly reduce the risk of ahot water heater leak, extend the life of your appliance, and protect your Florida home from unexpected water damage.
Frequently Asked Questions about Water Heater Leaks
We often hear similar questions from homeowners across Florida when they’re dealing with ahot water heater leak. Here are some of the most common ones, with our expert answers:
How do I know if my water heater leak is serious?
A leak from the tank body itself is always serious and requires replacement. This indicates that the internal lining has failed, and patching it is not a viable or safe option. Rapidly pooling water, extensive rust on the tank’s exterior, or strange noises like hissing, banging, or popping coming from the tank are also signs of a serious problem that warrants immediate professional attention. If you see water accumulating quickly or if the leak persists despite minor tightening, it’s time to call a plumber.
Can a leaking water heater be dangerous?
Yes, absolutely. Ahot water heater leakcan lead to several dangerous situations. Firstly, it can cause significant water damage to your home’s structure, flooring, and personal belongings. Secondly, the constant moisture creates an ideal environment for mold and mildew growth, which can pose serious health risks, especially respiratory issues. Thirdly, if water comes into contact with electrical components, it can create electrical shorts, increasing the risk of fire or electrocution. For gas water heaters, a leak near the burner or flue pipe could potentially interfere with proper ventilation, leading to a buildup of carbon monoxide, an odorless and colorless gas that can be fatal. Acting quickly is crucial to mitigate these dangers.
What are the differences in leak fixes for gas vs. electric heaters?
The fundamental sources of leaks (e.g., loose pipe connections, faulty T&P valves, corroded tanks, or leaky drain valves) are often the same for both gas and electric water heaters. Therefore, the physical fixes for these shared issues, such as tightening connections or replacing a valve, are largely similar.
The main difference lies in thepower shutoff procedureand the presence of specific components. For an electric heater, you’ll shut off power at the circuit breaker. For a gas heater, you’ll turn off the gas supply at the unit’s valve. Gas heaters also have unique components like a thermocouple, gas valve, and burner assembly. While issues with these components can lead to a lack of hot water or gas leaks, they rarely cause water leaks from the tank itself. Electric heaters have heating elements and thermostats that can sometimes leak if their gaskets fail, but this is a specific issue to electric models. Regardless of the type, if the leak is from the tank body, the solution is almost always replacement.
Conclusion
Ahot water heater leakis more than just an inconvenience; it’s a potential disaster waiting to happen. From the moment you find that first drip, acting fast is crucial to protect your home and your wallet. We’ve walked through the essential immediate steps—shutting off power/gas and water supply—and explored the common culprits behind leaks, from simple loose connections to the more serious internal tank corrosion.
While some minor issues might be DIY-friendly, knowing when to call a professional plumber for significant leaks or aging units is key. Regular maintenance, such as flushing your tank and checking your anode rod and T&P valve, can prevent many future problems.
But if despite your best efforts, a leak leads to extensive water damage in your home, don’t face the insurance company alone. Documenting every detail, from photos to receipts, is vital for your claim. That’s where we come in. At Global Public Adjusters, Inc., we specialize in representing homeowners and business owners in Florida, including Orlando and Pensacola, to ensure you receive the maximum settlement for your property damage. We understand the complexities of water damage claims and are here to advocate for your rights. If you’re dealing with water damage from ahot water heater leak, don’t hesitate to reach out for expert assistance with yourWater damage claims Orlando.